Posts

Showing posts from June, 2017

What to do when you can't connect your computer or cell phone to a public Wi-Fi system

Image
Most public networks make use of a Captive Portal which is the authorisation page where you actually login to their network. However many modern browsers cannot redirect to these captive portals due to the new security protocols. This usually happens because of the wide adoption of HTTPS over all websites. A protocol called HSTS ( HTTP Strict Transport Security) forces browsers to use HTTPS on all sites. As a result, whenever you connect to a public network, the request to grant access is intercepted and is redirected to the captive portal. However, sometimes this redirect is blocked by the browser because it tries to redirect the request to HTTPS before connecting to the server as a security measure.  The only solution is to force a redirect by using a website that doesn't use any security protocols. It's just a pure, unencrypted and not secured connection that will simply allow a redirect. Open your browser window in such a case and type : neverssl.com

Hackintosh- installation

Image
Before starting off   note that this guide just gives you a starting point of how hackintoshing works, and how it has to be done. Everyone will have different experiences, based on the hardware they have chosen. But in the end, hopefully, you will have a fully functional hackintosh. Requirements Once you’re finished building your computer, you need a couple of downloads from the   downloads   section of  tonymacx86 website and  download the following: iBoot iBoot legacy (alternative, if iBoot doesn’t work for your CPU) MultiBeast You have to burn iBoot to a CD or DVD . Don’t forget to copy MultiBeast to a USB thumb drive as well. Apart from this, you’ll also need the Mac OS X v10.6.7 update combo, which you can get  HERE . Although the 10.6.8 update is out, 10.6.7 is the one which doesn’t cause much problems, and it’s recommended to upgrade to it first. Finally, DSDT  a useful file, helps a lot in making the OS recognise your motherboard even better. So have a look

How to install Mac on unsupported PCs- Hackintosh

Image
There are basically 2 reasons why people buy a Mac: The cool design The powerful OS However you need to loosen your pockets quite a bit when it comes to owning one. A Macintosh is certainly better at many tasks than a Windows PC owing to the Mac OS X. But due to the cost, many aren't just able to buy it. There are two answers to the question that " Can Mac OS X be installed on a regular PC?" - the easy one is a straight NO and a more difficult one is a possible YES. Well you really can install Mac on an unsupported PC with a few modifications. This will be just as powerful and effective and fully upgradable as the original one and will cost you about just the half or even lesser of what it will take you to have a complete original Mac.  What is Hackintosh? Hackintosh is a combined term for Hacked Macintosh and the process of building one is called building a Hackintosh or CustoMac. It simply means building a PC with some specific hardware and using

How to create bootable USB drives or SD cards for any Operating System

Image
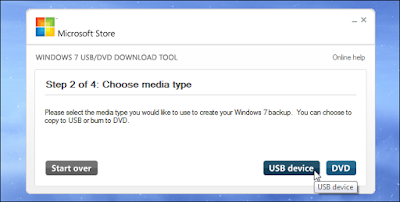
It used to be an easy job creating a bootable CD/DVD by just downloading an ISO file and burning it to the disk. Times have now changed and we have USB sticks and SD cards with more capacity than these disks. Making a bootable USB drive is a little different than making a bootable DVD. The USB drive's data partition needs to be made bootable. This process will wipe your USB drive or SD card. For Windows 7, 8 or 10 This can be done very easily by Microsoft's own Windows USB/DVD download tool  to create a bootable drive that you can use to install Windows. To run this tool, you will need a Windows installer ISO file. Just provide the ISO file and a USB flash drive and the tool will do the rest. If you're running a Windows 10 computer, you can download an ISO or burn Windows 10 installation media directly using Microsoft's Media Creation Tool. For a Linux ISO The best alternative for this job is Rufus- it's faster and more reliable than

Dual Boot Mac OS X and Linux

Image
It's quite easy to install Windows alongside Mac, unfortunately Boot camp does not allow you to install Linux with Mac. For this you'd want to install a third-party boot loader called rEFInd. Let's get started. Installing rEFInd rEFInd is a boot manager that allows you to choose between Linux, Mac OS X, Windows and other operating systems during startup(at boot time). Installing rEFInd makes dual-booting easier. You can download it from the rEFInd page on SourceForge  which will be a zip file as refind-bin-<version>.zip . Open a terminal window by Command+Space and typing Terminal, and pressing enter. Drag and drop the install.sh file from the downloaded zip file into the terminal window to run it. Shut down your Mac and then reboot your system. Remember it's a complete shut down and not a restart. Now you should see the rEFInd boot manager screen. Partition your Mac As always, you'll need to resize your partition to make room for Linux.

Dual Boot Windows and Mac OS X

Image
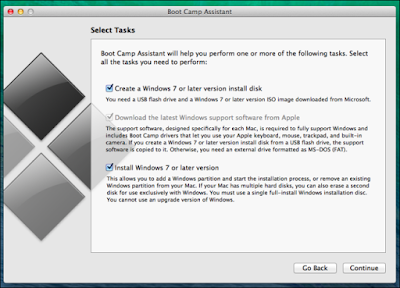
Before proceeding with dual-booting Windows alongside Mac OS X, be sure you want to do this because using boot camp and installing Windows alongside Mac OS X may take a lot of space and we all know that memory in case of a Macintosh is fairly expensive. Requirements You'll need a non-enterprise 64-bit Windows 7 or higher and a Mac from after 2009(the earlier versions do not support installation of Windows 8 or higher). You'll also need a full version of Windows which means, an upgraded version won't work. A USB drive of size at least 8 GB to install Windows and appropriate drivers. Do create a backup of your data as a slight mistake or any bug may result in loss of precious(or not so precious) data. Installation For installation of Windows, you'll use Boot Camp Assistant application that already comes with your Mac. Open it by pressing Command+Space, typing Boot Camp and pressing Enter. The Boot Camp automatically copies Windows installation files

Dual Boot Windows and another Windows

Image
Sometimes it so happens that we have one version of Windows installed on our computer and we want to try out another recently launched version but we neither want to format and replace our older Windows nor does our computer support virtualisation. In such a case, dual-boot may come handy. Here I have taken the example to installing Windows 8 alongside Windows 7 but you can do this for any version. Creating some space Initially you need to free about 20GB of data that Windows 7 has occupied. To do so, open disk management utility (Win+R then diskmgmt.msc and enter). Now you need to right click on the C: drive and select Shrink Volume to reduce the partition size. A dialog box will appear asking how much space you want to shrink from the drive. Remember that the size is always in MB (1GB=1024 MB) so do a little bit of calculation before actually shrinking the size.  Once your volume is shrunk, the reduced space will be visible as unallocated memory and represented with