Hackintosh- installation
Before starting off note that this guide just gives you a starting point of how hackintoshing works, and how it has to be done. Everyone will have different experiences, based on the hardware they have chosen. But in the end, hopefully, you will have a fully functional hackintosh.


Requirements
Once you’re finished building your computer, you need a couple of downloads from the downloads section of tonymacx86 website and download the following:
- iBoot
- iBoot legacy (alternative, if iBoot doesn’t work for your CPU)
- MultiBeast
You have to burn iBoot to a CD or DVD. Don’t forget to copy MultiBeast to a USB thumb drive as well. Apart from this, you’ll also need the Mac OS X v10.6.7 update combo, which you can get HERE. Although the 10.6.8 update is out, 10.6.7 is the one which doesn’t cause much problems, and it’s recommended to upgrade to it first. Finally, DSDT a useful file, helps a lot in making the OS recognise your motherboard even better. So have a look at the DSDT database. If your motherboard is listed, there must be a DSDT for it. Download it to the thumb drive as well. Don't worry if there isn’t a DSDT for your motherboard. Using a DSDT is completely optional.
After you’ve got all the required and above mentioned stuff, you’re all set, and ready to start with the installation procedure. Also make sure you have noted down all the installation steps as well.
TIP: While installing, it is better to have access to a secondary computer as well. This is not mandatory, but it really helps when you have a problem with your hackintosh, just look for it in the forums using the other computer, and you’ll find the answer. Nearly each and every problem you might encounter has a solution on the tonymacx86 forums. So there’s no need to worry if you get stuck at some point. This is normal, and your troubleshooting skills will definitely come in handy.
Initial steps
First, there are some minimum requirements that should be fulfilled, i.e.
- Just one USB keyboard and mouse, and nothing else plugged into the USB ports.
- You should’ve only one SATA hard drive, preferably a formatted one with no data on it. Unplug any other hard drives.
- Make sure your optical drive is also attached to a SATA port.
- If you have more than 4GB of RAM, remove it, and we will add it later on.
- Finally, you must be running a single monitor on a single video card.
Next, you need to change a couple of BIOS settings. Now this may vary, depending upon your motherboard manufacturer, but here are the general things your motherboard should have. It is recommended to select the load optimized defaults option (or other option, corresponding to your motherboard). If you have overclocked your CPU, be sure to restore it to its default clock speed for the ease of installation and for avoiding any conflicts. Then, you need to set the BIOS to AHCI mode. Basically this aims to configure all Hard Drives and Optical drives as SATA. Next, the boot sequence needs to be altered. The boot priority should be to boot from optical drive first, and then from the hard drive. Henceforth, when you will boot up your PC, it will try to boot directly from the iBoot disc, so that we may proceed with the installation. Additionally, set HPET or High Precision Event Timer (depending on how it appears in your motherboard) to Enabled, and set its value to 64, if that’s an option.Do save all changes before you exit the BIOS.
Initiating the installation
After saving the BIOS settings, reboot your computer, and insert the iBoot disc that you burned earlier. Chances are, it will go perfectly fine. But if it doesn’t, and nothing appears on the screen or some error comes up, you might need to give iBoot Legacy a try. Burn it to a disc, and try booting from it. Once iBoot is loaded, you’ll see a screen with the tonymacx86 logo and a CD icon that reads “iBoot”. This is referred to as the “chameleon prompt”.
At this point, eject the iBoot disc, and insert your Mac OS X Snow Leopard install disc. Wait a couple of seconds, and then press the F5 key to refresh. Now the CD icon will read “Mac OS X Install DVD”.
All you need to do is press ENTER to allow the disc to start loading up files. Wait till you get to the installation screen. That’s the easy way, but mostly it doesn’t go very well, and you might be presented with either a kernel panic or an unable to load screen.
If such a thing happens, just reboot your computer with iBoot, insert the Mac OS X Install disc when iBoot loads up, and before hitting enter, type some commands from your keyboard. Apparently there is no entry area on the screen, however whatever you type will be displayed on the screen as you type. When you type something at the chameleon prompt, this is called a “Boot Flag”. You can use multiple boot flags at once, and that's exactly what we want to go for. So in such a case when you can’t make your way to the installer, you can use the PCIRootUID=1 -x -v boot flag. -v is for verbose mode, which displays all the activity going on in the background (when you’d normally see the Apple logo), so that you may troubleshoot based on where the installer hangs up. -x is for safe mode, and PCIRootUID=1 tells the installer regarding your video card.
So once you see the installer screen,you must know that 50% of your work has been done. Installation from here on is the same as on a normal Mac. Select your preferred language, and press continue.
On the next screen, see the menu bar at the top. On the menu bar, click Utilities>Disk Utility. Once disk utility loads up, select your hard drive, and click the Partition tab. Under Volume Scheme, select 1 Partition, name it anything that suits you (Mac HD, Snow Leopard, or something that you can remember), and set the partition format to “Mac OS Extended (Journaled)”.
Next, click the Options button, and make sure that “GUID Partition Table” is selected.
Note: if your hard drive is larger than 1TB, partition it and make it smaller than 1TB. Then click Apply, and click Partition to carry out the changes. Once you get the Partition Complete Prompt, exit disk utility, and click Next on the installer. On the next screen, click the hard drive partition you just prepared for installation. Click the Customize button on the lower left corner, and deselect any unwanted stuff.
Finally, click Install. The installation takes about 15-20 minutes. Be sure to keep moving the mouse cursor every once a while, it’s just a safety measure to avoid the installer going to sleep.
When the installation ends, you might get either an Install Succeeded or an Install Failed message. It doesn’t really matter, installation is in fact, complete, and now we will proceed to perform the post-install tweaks.
Or perhaps…
Whatever the case is, just press Restart. Be sure to swap disks, eject the Mac OS X install disc and insert iBoot back in. Once you boot with iBoot, you will be presented with two choices now. This time, you have to boot from the hard drive. It will be displayed with an Apple icon, and with the name that you gave it earlier. Use the arrow keys to highlight the hard drive, and press Enter to boot from it.
You might also get to see the Mac OS X installation video. After that, you might be asked a few questions for setting up your Mac. This should be straightforward. Well you’re almost there!
Now, depending upon your hardware configuration, you may or may not have some hardware components working at their full potential, i.e. you may or may not have audio, graphics acceleration, internet access, USB functionality, and other stuff working. If something is working right after the install, it is said to be working Out Of the Box (OOB).
It's now time to use MultiBeast to enable the devices that aren’t working and to enable your hackintosh to boot directly from the hard drive, without the need for iBoot. But before that, run the Mac OS X v10.6.7 update combo that you downloaded to a USB thumb drive earlier (alongside other stuff). Install it, but don’t click restart when it prompts you to.
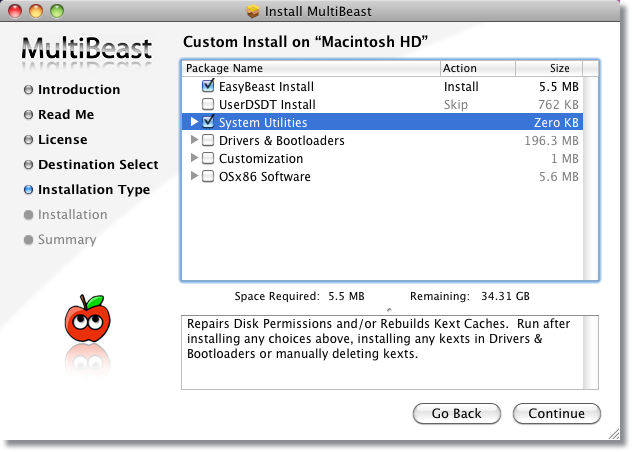
Then run MultiBeast from your USB thumb drive. Keep clicking Continue until you reach the screen with some choices. Now, if you have a DSDT for your motherboard, be sure to have it copied to the desktop, and select UserDSDT and System Utilities from MultiBeast.
If you don’t have a DSDT, just select EasyBeast and System Utilities. Once done, run MultiBeast installer.
Don’t worry about enabling the devices and peripherals right now, because the combo update sometimes causes the functional devices to stop functioning, and that’s revealed after you restart. So restart your hackintosh. This time, without iBoot disc, see if you’re able to boot directly off the hard drive. If not, have a look at your BIOS settings, search for people with similar motherboard, and you’ll be able to find a solution.
So once you have booted into the OS, you’ll notice some previously OOB working stuff might not be working now. This is normal. Remember, after every combo update, you might need to re-run MultiBeast to enable any devices disabled due to the update. So this time, run MultiBeast, and select System Utilities first, it is something you always need to check while running MultiBeast. For any other non-functional devices, you can just go ahead and look under Drivers & Bootloaders>Kexts & Enablers for enabling them. When you select something, its description appears in the description column. You always need to select only one kext at a time. Don’t install all of the kexts under a category at once. Install, reboot, and see if that kext had any impact. If not, you can run MultiBeast again, with a different selection. If you need to delete a kext that didn’t work, have a look at its description in Multibeast. Note down its path, navigate to that particular folder using the Finder, and delete it.
Note: By default, kexts are installed in a folder named “Extensions”. To access it, navigate to your Mac hard drive, open the System folder, then Library, and then find the folder named Extensions. So if you have to remove a kext from System>Library>Extensions, you know where to look for. Same is the case with Extra>Extensions. Extra is a folder on the Mac hard drive, and is created by MultiBeast. There’s another folder inside Extra, named Extensions, but this Extensions folder contains important custom kexts installed by MultiBeast. It also contains two important files. First one is smbios.plist, and the second one is com.apple.boot.plist. These are important files and trust me you don't want to delete them.


Comments
Post a Comment