How to create an SRT file
SRT files, also known as SubRip format files, are types of files that contain subtitle phrases for movies. A large number of media players are supportive of SRT files. You do not need to purchase or download any third-party software to create an SRT file, because a text editor such as "Notepad" is all that you need.
Make subtitles using Notepad
Following are some easy steps you need to follow to make an SRT file on Notepad
1
00:00:20,000 --> 00:00:24,400
Hi there!
2 00:00:24,600 --> 00:00:27,800 Oh, hello friend! What's your name?
- 1. Start the first line with the number 1.
- 2. Now input the times of the subtitle/caption start and end. The
00:00:20,000is in hours:minutes:seconds,milliseconds format. You can usually look at the video with milliseconds in Windows Movie Maker while you have Notepad open as well. This will judge the synchronisation of the subtitle with the speech.( Make sure to display both windows for easier work by pressing on both programs in the taskbar while pressing Ctrl and right-clicking on either program tab and selecting Show Windows Side By Side.) - 3. Now just place a space between every line.
- 4. Repeat the steps until you finish all the lines. Remember to keep saving your work. You can save it with a .srt extension.
Better looking subtitles with Aegisub
Now let's get above the conventional and let's say, the basic method of creating a subtitle file. For customising our subtitle into a more professional looking subtitle by customising the font, size, colour and position of the subtitle, we will use Aegisub.
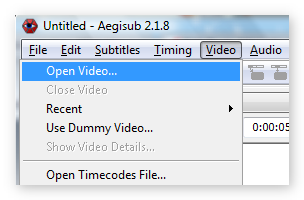
- Load the video (in AVI, MP4, MPG format) you want to subtitle by going to Video in the top menu bar > Open Video.

3. You can select to create a new style to your taste in the Storage section (which ensures you’ll always have this style saved) and copy it to the Current Script box (so you can use it to subtitle the video you opened earlier).

- 4. Then click OK to go back to the main window. In the Audio box, click on the start of the sound clip and right-click at the end of the clip. Press the S key or the space bar to hear the audio clip before inputting your subtitle in the Edit Box (you can also copy and paste the start and end frames as you see them in the video).

5. (Optional) Double-click wherever you want the subtitles to appear in the Video Box to set the position. Sometimes, you may wish to add notes of regional sayings, for example, at the top of your video.


- 6. Type your subtitle and press Enter (or hit Commit). Note that to display two lines, you need to use the term
\N
in the Edit Box. 
- Also, hit Save (Ctrl + S) to save your entire subtitle file (the default file extension is .ass for Advanced SubStation Alpha.)
- Now repeat step 2 to 4 until you finish subtitling (this combo may come in handy: click, right-click, space bar, type the subtitle, Enter). I'd advise to save any changes you make by hitting Commit and saving your whole subtitle file often.

Comments
Post a Comment